Wednesday, May 20, 2015

[GIT] The git commands that I often use

I just list the git commands that I often use and keep in this document for reference.


// pull the newest commit from origin
git pull origin "your branch"

// check out to a branch
git checkout "your branch name"

// apply the diff file
git apply "your diff file"

// Check the diff
git diff [your file]

// code commit
git commit -a -m "This is bug."

// push commit to remote site,
git push "your remote site" "your branch"

// repository name
git remote rm origin
git remote add origin git@...git
git remote set-url origin git@...git

// add new remote repository name
git remote add "remote repository name" ssh://.......

//Force to go back the current newest commit
git reset --hard HEAD
HEAD^ // the previous commit
HEAD~2 // the previous two commit
git reset --hard eb2b844 // the previous a commit with your hash code
--soft // the change will be added to stage
--hard // all the change will be deleted

//cancel the modification of some files.
git checkout -- <file>

// modify the last commit
git commit --amend

// reset the change of some files
git reset HEAD <file>

// reset the merge
git reset

// clean up the changes
git cleanup -f

// checkout a branch
git checkout "branch"
// checkout a branch to new branch with track
git checkout -t -b bcm origin/bcm

// look up the commit hash
git log  
                     
// cherry pick the commit
git cherry-pick "hash code"

// push to remote repository
git push remote repository name "branch"


// use GUI to see the diff, commit and branch tree
gitk --all&

// merge the branch to this branch
git merge "branch"

// There are several mergetools, such as, kdiff3/meld/p4merge
// I suggest to use p4merge/meld
// the difftool "p4merge" to see the diff of two commit with the cc files
git difftool -t p4merge aa202d3..be15911907d9 -- *.cc
git mergetool -t p4merge myfile.cc

// keep the temp modification
git stash
// check the stash list
git stash list
// apply the stash
git stash apply --index
// to apply the stash and then immediately drop it from your stack.
git stash pop
// create a branch from a stash
git stash branch "your stash branch name"

// Undo a commit and redo
git commit ...              (1)
git reset --soft HEAD~1     (2)
<< edit files as necessary >> (3)
git add ....                (4)
git commit -c ORIG_HEAD     (5)


// Remove all .pyc or .xxx files
find . -name "*.pyc"; -exec git rm -f {} \;

// Remove a file in remote repository without deleting local file
git rm --cached your_file_here

// Set ignore file:
git config --global core.excludesfile ~/.gitignore_global

// Ignore SSL verification
env GIT_SSL_NO_VERIFY=true git command
or set to config:
git config http.sslVerify "false"

// Get sources after commit id
git checkout 336e1731fd8591c712d029681392e5982b2c7e6b src/abc/*

// *** Avoiding annoying merge commits:
git pull --rebase origin master
git pull --rebase origin

// Avoiding to merge or commit your customised configs:
git update-index --assume-unchanged [filepath]

// Putting back and tracking the files above:
git update-index --no-assume-unchanged [filepath]

Tuesday, May 12, 2015

[Django] The summary of "Writing your first Django app" in offical Django document

Well, if we want to really get understanding something, the best way is to study and do by yourself. The official Django web site gives us a very good example for those who are the first time to use Django. So this article is just the quick summary of this "Writing your first Django app" as follows:

Writing your first Django app, part 1
Writing your first Django app, part 2
Writing your first Django app, part 3
Writing your first Django app, part 4
Writing your first Django app, part 5
Writing your first Django app, part 6
Advanced tutorial: How to write reusable apps

$ django-admin startproject r300
$ python -m django --version
$ python -c "import django; print(django.get_version())"
$ django-admin startproject R300
$ python manage.py startapp demo
$ python manage.py migrate
$ python manage.py runserver 0.0.0.0:8000

After finishing the above steps, we can get the file structure like the picture below:


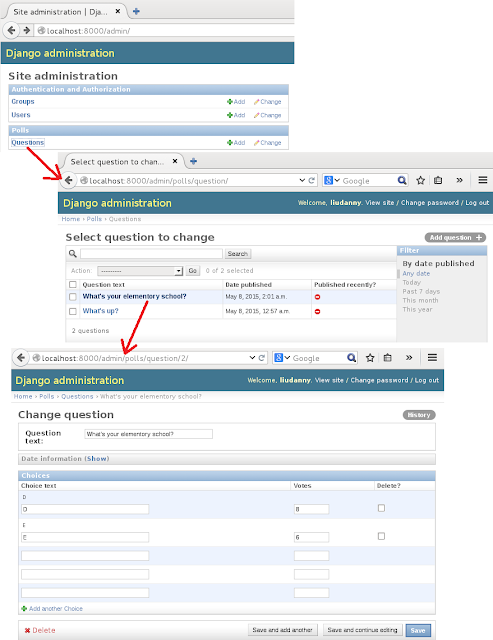
This picture is about the polls application that looks like:

And this picture is about the admin application that is to manage polls data:


If you want to deploy this polls application to Apache web server with mod_wsgi module, please follow the previous article to install Apache and mod_wsgi. Then, we need to add the setting of /etc/apache2/site-available/default is as follows:


But, in this case, I have not resolved the permission for database and admin application. So, hope to fix these later.

P.S:
There is a very good django e-book as follows:
http://www.djangobook.com/en/2.0/index.html


[Apache] Install Apache2 and mod_wsgi module

Install Apache Web Server
sudo apt-get install apache2 apache2-threaded-dev apache2-doc apache2-utils

  • Edit the main Apache configuration file to adjust the resource use settings.
    • /etc/apache2/apache2.conf


Install Support for Scripting ( Python )
sudo apt-get install libapache2-mod-python

  • An easy way to see which modules are installed is to run a list command on the directory:
    • ls -al /etc/apache2/mods-available/


  • To enable an installed module, run the following command:
    • a2enmod [module-name]


Install Apache Modules
sudo apt-get install libapache2-mod-wsgi

or to follow this intruction to compile and install from the source code:
https://code.google.com/p/modwsgi/wiki/QuickInstallationGuide

Operate Apache Web Server
  • sudo apachectl restart
  • sudo apachectl stop
  • sudo apachectl start

Give a try with WSGI 

  • Add the following setting to /etc/apache2/sites-available/default

WSGIScriptAlias /myapp /home/liudanny/django_proj/myapp.py

<Directory /home/liudanny/django_proj>
    Order allow,deny
    Allow from all
</Directory>


  • Add a wsgi file: /home/liudanny/django_proj/myapp.py

def application(environ, start_response):
    status = '200 OK'
    output = 'Hello World!'

    response_headers = [('Content-type', 'text/plain'),
                    ('Content-Length', str(len(output)))]
    start_response(status, response_headers)
    return [output]


Ref:
https://www.linode.com/docs/websites/apache/apache-2-web-server-on-debian-7-wheezy
https://docs.djangoproject.com/en/1.8/howto/deployment/wsgi/modwsgi/

Wednesday, May 6, 2015

[Python] A simple example of Python Egg

The following content is based on this article:
http://www.mxm.dk/2008/02/python-eggs-simple-introduction.html

hello/
  _wrapper.so
  hello.py ==>
    def helloworld():
        print 'Hello World'


1. First, prepare your setup.py ==>
from distutils.core import setup # Distutils

setup(name='hello',
    version='1.0',
    packages=['hello',],
    package_data={
        'hello': ['*.so'],
    }
)

2. Run python setup.py sdist

3. Change a line in your setup.py ==>
#from distutils.core import setup # Distutils
from setuptools import setup, find_packages # Egg

setup(name='hello',
    version='1.0',
    packages=['hello',],
    package_data={
        'hello': ['*.so'],
    }
)

4. Run  python setup.py bdist_egg

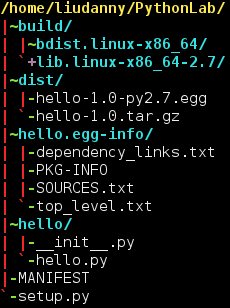
5. Then you get a new file in your dist directory:
dist/
hello-1.0-py2.4.egg

My example files and output package are here:


6. To install the egg file
> sudo easy_install hello-1.0-py2.7.egg
in case if there is an error for easy_install
> sudo apt-get install python-setuptools

Tuesday, May 5, 2015

[XorPlus] The verbose transaction of the commmand "set vlan-interface interface"


XorPlus# set vlan-interface interface vlan2 vif vlan2 address 10.10.1.1 prefix-length 24
[edit]
XorPlus# commit
Aug 28 2007 21:11:10 XorPlus local0.debug : [RTRMGR]Expanding xrl $(vlan-interface.targetname)/ifmgr/0.1/start_transaction->tid:u32=$(vlan-interface.TID)
Aug 28 2007 21:11:10 XorPlus local0.debug : [RTRMGR]Executing XRL: >finder://fea/ifmgr/0.1/start_transaction<
Aug 28 2007 21:11:10 XorPlus local0.debug : [RTRMGR]Expanding xrl $(vlan-interface.targetname)/ifmgr/0.1/create_interface?tid:u32=$(vlan-interface.TID)&ifname:txt=$(@)
Aug 28 2007 21:11:10 XorPlus local0.debug : [RTRMGR]Executing XRL: >finder://fea/ifmgr/0.1/create_interface?tid:u32=1523154&ifname:txt=vlan2<
Aug 28 2007 21:11:10 XorPlus local0.debug : [RTRMGR]Expanding xrl $(vlan-interface.targetname)/ifmgr/0.1/set_interface_enabled?tid:u32=$(vlan-interface.TID)&ifname:txt=$(interface.@)&enabled:bool=`~$(@)`
Aug 28 2007 21:11:10 XorPlus local0.debug : [RTRMGR]Executing XRL: >finder://fea/ifmgr/0.1/set_interface_enabled?tid:u32=1523154&ifname:txt=vlan2&enabled:bool=false<
Aug 28 2007 21:11:10 XorPlus local0.debug : [RTRMGR]Expanding xrl $(vlan-interface.targetname)/ifmgr/0.1/create_vif?tid:u32=$(vlan-interface.TID)&ifname:txt=$(interface.@)&vif:txt=$(@)
Aug 28 2007 21:11:10 XorPlus local0.debug : [RTRMGR]Executing XRL: >finder://fea/ifmgr/0.1/create_vif?tid:u32=1523154&ifname:txt=vlan2&vif:txt=vlan2<
Aug 28 2007 21:11:10 XorPlus local0.debug : [RTRMGR]Expanding xrl $(vlan-interface.targetname)/ifmgr/0.1/set_vif_description?tid:u32=$(vlan-interface.TID)&ifname:txt=$(interface.@)&vif:txt=$(vif.@)&description:txt=$(@)
Aug 28 2007 21:11:10 XorPlus local0.debug : [RTRMGR]Executing XRL: >finder://fea/ifmgr/0.1/set_vif_description?tid:u32=1523154&ifname:txt=vlan2&vif:txt=vlan2&description:txt=<
Aug 28 2007 21:11:10 XorPlus local0.debug : [RTRMGR]Expanding xrl $(vlan-interface.targetname)/ifmgr/0.1/set_vif_enabled?tid:u32=$(vlan-interface.TID)&ifname:txt=$(interface.@)&vif:txt=$(vif.@)&enabled:bool=`~$(@)`
Aug 28 2007 21:11:10 XorPlus local0.debug : [RTRMGR]Executing XRL: >finder://fea/ifmgr/0.1/set_vif_enabled?tid:u32=1523154&ifname:txt=vlan2&vif:txt=vlan2&enabled:bool=false<
Aug 28 2007 21:11:10 XorPlus local0.debug : [RTRMGR]Expanding xrl $(vlan-interface.targetname)/ifmgr/0.1/create_address4?tid:u32=$(vlan-interface.TID)&ifname:txt=$(interface.@)&vif:txt=$(vif.@)&address:ipv4=$(@)
Aug 28 2007 21:11:10 XorPlus local0.debug : [RTRMGR]Executing XRL: >finder://fea/ifmgr/0.1/create_address4?tid:u32=1523154&ifname:txt=vlan2&vif:txt=vlan2&address:ipv4=10.10.1.1<
Aug 28 2007 21:11:10 XorPlus local0.debug : [RTRMGR]Expanding xrl $(vlan-interface.targetname)/ifmgr/0.1/set_prefix4?tid:u32=$(vlan-interface.TID)&ifname:txt=$(interface.@)&vif:txt=$(vif.@)&address:ipv4=$(address.@)&prefix_len:u32=$(@)
Aug 28 2007 21:11:10 XorPlus local0.debug : [RTRMGR]Executing XRL: >finder://fea/ifmgr/0.1/set_prefix4?tid:u32=1523154&ifname:txt=vlan2&vif:txt=vlan2&address:ipv4=10.10.1.1&prefix_len:u32=24<
Aug 28 2007 21:11:10 XorPlus local0.debug : [RTRMGR]Expanding xrl $(vlan-interface.targetname)/ifmgr/0.1/set_address_enabled4?tid:u32=$(vlan-interface.TID)&ifname:txt=$(interface.@)&vif:txt=$(vif.@)&address:ipv4=$(address.@)&enabled:bool=`~$(@)`
Aug 28 2007 21:11:10 XorPlus local0.debug : [RTRMGR]Executing XRL: >finder://fea/ifmgr/0.1/set_address_enabled4?tid:u32=1523154&ifname:txt=vlan2&vif:txt=vlan2&address:ipv4=10.10.1.1&enabled:bool=true<
Aug 28 2007 21:11:10 XorPlus local0.debug : [RTRMGR]Expanding xrl $(vlan-interface.targetname)/ifmgr/0.1/commit_transaction?tid:u32=$(vlan-interface.TID)
Aug 28 2007 21:11:10 XorPlus local0.debug : [RTRMGR]Executing XRL: >finder://fea/ifmgr/0.1/commit_transaction?tid:u32=1523154<
Aug 28 2007 21:11:10 XorPlus local0.warn : [SIF]Vlan-interface vlan2, changed state to up
Aug 28 2007 21:11:10 XorPlus local0.debug : [RTRMGR]Validating with XRL: >finder://fea/common/0.1/get_status<
Waiting for merging configuration.
Commit OK.

[Install] OpenGrok and Doxygen

Source tracing is a task/job that is heavily relied on good tool for software developers or programmers to fulfill their mission. My personal suggestions are OpenGrok and Doxygen. Here is not going to analysis their merits but just record my way to install them.

[Debian] Prepare Debian 7 with software development

This document is about the record for preparing Debian 7 with software development
=== Install the required packages ===
sudo apt-get install ctags
sudo apt-get install cscope
sudo apt-get install curl
sudo apt-get install autotools-dev
sudo apt-get install automake
sudo apt-get install subversion
sudo apt-get install libpam0g-dev
sudo apt-get install libtool
sudo apt-get install g++
sudo apt-get install libssl-dev
sudo apt-get install build-essential
sudo apt-get install linux-source
sudo apt-get install kernel-package
sudo apt-get install libncurses5-dev
sudo apt-get install make-kpkg
sudo apt-get install build-essential linux-source kernel-package libncurses5-dev
sudo apt-get install git python-dev python-virtualenv libssl-dev libffi-dev
sudo apt-get remove openjdk-6-jre-lib openjdk-6-jre-headless
#sudo apt-get -y install openjdk-7-jdk
echo "deb http://ppa.launchpad.net/webupd8team/java/ubuntu trusty main" | tee /etc/apt/sources.list.d/webupd8team-java.list
echo "deb-src http://ppa.launchpad.net/webupd8team/java/ubuntu trusty main" | tee -a /etc/apt/sources.list.d/webupd8team-java.list
apt-key adv --keyserver hkp://keyserver.ubuntu.com:80 --recv-keys EEA14886
apt-get update
apt-get install oracle-java8-installer
sudo apt-get -y install eclipse

=== linux-image ===
sudo apt-get install linux-image-amd64
( the above part is for undo action )
sudo dpkg --list | grep linux-image
sudo dpkg --purge linux-image-NN


=== add these to /etc/profile ===
export JAVA_HOME=/usr/lib/jvm/java-7-openjdk-amd64
export JRE_HOME=${JAVA_HOME}/jre
export CLASSPATH=.:${JAVA_HOME}/lib:${JRE_HOME}/lib
export PATH=${JAVA_HOME}/bin:${JRE_HOME}/bin:$PATH

=== Install PyDev on Eclipse ===
Installing with the update site
To install PyDev and PyDev Extensions using the Eclipse Update Manager, you need to use the Help > Install New Software... menu
In the next screen, add the update site(s):
http://pydev.org/updates


=== Installing VirtulBox Guest Additions on Debian ===

Follow these steps to install the Guest Additions on your Debian virtual machine:
Login as root;
Update your APT database with apt-get update;
Install the latest security updates with apt-get upgrade;
Install required packages with apt-get install build-essential module-assistant;
Configure your system for building kernel modules by running m-a prepare;
Click on Install Guest Additions… from the Devices menu, then run mount /media/cdrom.
Run sh /media/cdrom/VBoxLinuxAdditions.run, and follow the instructions on screen.