I post a slide to give a basic introduction of Open vSwitch. For the more in details, please check out the SlideShare URL as follows:
http://www.slideshare.net/teyenliu/the-basic-introduction-of-open-vswitch
Some Useful example of the OVS commands:
sudo ovs-vsctl show
sudo ovs-vsctl add-br mybridge
sudo ovs-vsctl del-br mybridge
sudo ovs-vsctl add-port mybridge port-name
sudo ovs-vsctl del-port mybridge port-name
sudo ovs-vsctl list Bridge/Port/Interface/...
sudo ovs-appctl fdb/show mybridge
sudo ovs-ofctl show mybridge
sudo ovs-ofctl dump-flows mybridge
sudo ovs-ofctl add-flow mybridge dl_src=02:a2:a2:a2:a2:a2,dl_dst=02:b2:b2:b2:b2:b2,in_port=2,dl_type=0x0800,nw_src=10.0.0.1,nw_dst=10.0.0.2,actions=output:6
sudo ovs-ofctl del-flows mybridge dl_src=02:a2:a2:a2:a2:a2,dl_dst=02:b2:b2:b2:b2:b2,in_port=2,dl_type=0x0800,nw_src=10.0.0.1,nw_dst=10.0.0.2
sudo ovs-ofctl add-flow dp0 in_port=2,actions=output:6
# This will delete all the flow entries in the flow table
sudo ovs-ofctl del-flows mybridge
Tuesday, January 7, 2014
Friday, January 3, 2014
[GNS3] All the related URLs with GNS3 and Open vSwitch
To play with Openvswitch in GNS3, here is Openvswitch 1.2.2 installed on Microcore 4.0 Linux as Qemu image.
http://brezular.com/2013/09/17/linux-core-qemu-and-virtualbox-appliances-download/
Here are the installation steps.
http://brezular.com/2011/09/03/part1-openvswich-creating-and-submitting-openvswitch-extension-to-microcore-upstream/
And GNS3 labs are available here.
http://brezular.com/2011/06/25/part2-openvswich-vlans-trunks-l3-vlan-interface-intervlan-routing-configuration-and-testing/
[KVM and OVS] Installing KVM and Open vSwitch on Ubuntu
These articles provides a very good explanation about how to install KVM and Open vSwitch on Ubuntu.
http://blog.scottlowe.org/2012/08/17/installing-kvm-and-open-vswitch-on-ubuntu/
http://networkstatic.net/installing-open-vswitch-with-kvm/
sudo ovs-vsctl add-br br0
sudo ovs-vsctl add-port br0 eth0
sudo ovs-vsctl list port
sudo ifconfig br0 192.168.1.x netmask 255.255.255.0
sudo route add default gw 192.168.1.1 br0
These two scripts bring up the KVM Tap interfaces into your
bridge from the CLI.
$ cat /etc/ovs-ifup
#!/bin/sh
switch='br0'
/sbin/ifconfig $1 0.0.0.0 up
ovs-vsctl add-port ${switch} $1
$ cat /etc/ovs-ifdown
#!/bin/sh
switch='br0'
/sbin/ifconfig $1 0.0.0.0 down
ovs-vsctl del-port ${switch} $1
#Then make executable
chmod +x /etc/ovs-ifup /etc/ovs-ifdown
sudo kvm -m 1024 -hda /media/Storage/imgs/centos.kvm -net nic,macaddr=00:11:22:CC:CC:C5 -net tap,script=/etc/ovs-ifup,downscript=/etc/ovs-ifdown &
OS Install
sudo kvm -m 512 -hda /media/Storage/imgs/centos.kvm -net nic,macaddr=00:11:22:CC:CC:C5 -net tap,script=/etc/ovs-ifup,downscript=/etc/ovs-ifdown -cdrom /media/Storage/vm-images/CentOS-6.2-x86_64-LiveCD.iso &
CD Boot
sudo kvm -m 512 -net nic,macaddr=00:11:22:CC:CC:10 -net tap,script=/etc/ovs-ifup,downscript=/etc/ovs-ifdown -cdrom /HD/Storage/vm-images/ubuntu-11.10-desktop-amd64.iso &
Make an Image from CD
sudo qemu-img create -f qcow2 /media/Storage/imgs/uCentOS-6.2.img 6G
http://blog.scottlowe.org/2012/08/17/installing-kvm-and-open-vswitch-on-ubuntu/
http://networkstatic.net/installing-open-vswitch-with-kvm/
I summarize the scripts from the above URLs as follows:
- ### Installing KVM and Open vSwitch on Ubuntu ###
sudo apt-get update && apt-get dist-upgrade
sudo apt-get install kvm qemu-kvm libvirt-bin virtinst virt-manager
sudo virsh net-destroy default
sudo virsh net-autostart --disable default
sudo aptitude purge ebtables
- ### Open vSwitch on Ubuntu ###
sudo apt-get install openvswitch-controller openvswitch-brcompat \
sudo openvswitch-switch openvswitch-datapath-source
# Edit this: /etc/default/openvswitch-switch and change this line:
#BRCOMPAT=no ==> #BRCOMPAT=yes
# to build and install the necessary module
sudo module-assistant auto-install openvswitch-datapath
- ### Add Open vSwitch bridge ###
sudo ovs-vsctl add-port br0 eth0
sudo ovs-vsctl list port
- ### Change your eth0 IP to your new br0 interface ###
sudo ifconfig br0 192.168.1.x netmask 255.255.255.0
sudo route add default gw 192.168.1.1 br0
These two scripts bring up the KVM Tap interfaces into your
bridge from the CLI.
$ cat /etc/ovs-ifup
#!/bin/sh
switch='br0'
/sbin/ifconfig $1 0.0.0.0 up
ovs-vsctl add-port ${switch} $1
$ cat /etc/ovs-ifdown
#!/bin/sh
switch='br0'
/sbin/ifconfig $1 0.0.0.0 down
ovs-vsctl del-port ${switch} $1
#Then make executable
chmod +x /etc/ovs-ifup /etc/ovs-ifdown
- ### BOOT HD IMG ###
sudo kvm -m 1024 -hda /media/Storage/imgs/centos.kvm -net nic,macaddr=00:11:22:CC:CC:C5 -net tap,script=/etc/ovs-ifup,downscript=/etc/ovs-ifdown &
OS Install
sudo kvm -m 512 -hda /media/Storage/imgs/centos.kvm -net nic,macaddr=00:11:22:CC:CC:C5 -net tap,script=/etc/ovs-ifup,downscript=/etc/ovs-ifdown -cdrom /media/Storage/vm-images/CentOS-6.2-x86_64-LiveCD.iso &
CD Boot
sudo kvm -m 512 -net nic,macaddr=00:11:22:CC:CC:10 -net tap,script=/etc/ovs-ifup,downscript=/etc/ovs-ifdown -cdrom /HD/Storage/vm-images/ubuntu-11.10-desktop-amd64.iso &
Make an Image from CD
sudo qemu-img create -f qcow2 /media/Storage/imgs/uCentOS-6.2.img 6G
Thursday, December 26, 2013
[Open Source] A list of useful Python Open Source Projects
Tornado is a Python web framework and asynchronous networking library
http://www.tornadoweb.org/en/stable/
a powerful interactive packet manipulation program
http://www.secdev.org/projects/scapy/
http://www.tornadoweb.org/en/stable/
a powerful interactive packet manipulation program
http://www.secdev.org/projects/scapy/
Tuesday, December 3, 2013
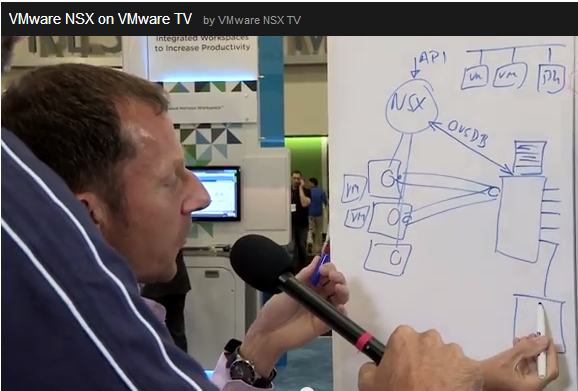
[NSX] Network Visualization Gets Physical
In VMware NSX, how to let network visualization gets physical?
The answer is "Layer 2 Gateway Services". The physical switches have to implement the OVSDB and related APIs that communicate with NSX Controller so that they can provide the mapping of the segment in virtual network and VLAN in physical network. For more information in details, you can check out the following URLs.
http://networkheresy.com/2013/08/15/network-virtualization-gets-physical/
https://www.youtube.com/watch?v=QDOlggwyrVA&feature=c4-overview-vl&list=PLdYldEmmLm2lz5Bd0bzGCDKSULL52ytJT
Ivan's NSX Architecture Introduction, it is very good.
http://demo.ipspace.net/get/NSXArch
Tuesday, November 19, 2013
[OpenVNet] The introduction of OpenVNet
Why I pay attention to OpenVNet is because it uses Trema-Edge as OpenFlow 1.3 Controller to communicate with Open vSwitch 1.10. It gives us a great example to use Trema-Edge in Virtual Network Environment and learn more about some use cases. Please check out the following lists:
What is OpenVNet?
http://www.slideshare.net/akirayokokawa/openvnet
Offical Web Site:
http://openvnet.com/
Github Source:
https://github.com/axsh/openvnet
What is OpenVNet?
http://www.slideshare.net/akirayokokawa/openvnet
Offical Web Site:
http://openvnet.com/
Github Source:
https://github.com/axsh/openvnet
[Quagga] How to compile and install Quagga on Ubuntu 12.04
The following steps are the compilation and installation for Quagga on Ubuntu 12.04. Hopefully it is helpful for you.
- Install all dependency(package)
- sudo apt-get build-dep quagga
- Give the path for all configurations files and libraries used by quagga for starting. I use this one /opt/quagga .... and this is done by this comand:
- ./configure --enable-vtysh --prefix=/opt/quagga --localstatedir=/opt/quagga sysconfdir=/opt/quagga
- Create new folder:
- sudo mkdir /opt/quagga
- Add new user :
- sudo adduser quagga
- Give the priviledge for the user quagga over the folder: /opt/quagga and for the folders and subfolders you give the privilegde for all rights : reading, changing and executing
- sudo chown quagga:quagga /opt/quagga
- sudo chmod 777 /opt/quagga
- Then you will be able to comiple Quagga:
- make
- sudo make install
Quagga configuration
--------------------
quagga version          : 0.99.22
host operating system   : linux-gnu
source code location    : .
compiler                : gcc
compiler flags          : -Os -fno-omit-frame-pointer -g -std=gnu99 -Wall -Wsign-compare -Wpointer-arith -Wbad-function-cast -Wwrite-strings -Wmissing-prototypes -Wmissing-declarations -Wchar-subscripts -Wcast-qual
make                    : make
includes                :
linker flags            :  -lcrypt   -lrt -lcap  -lm
state file directory    : /opt/quagga
config file directory   : /opt/quagga
example directory       : /opt/quagga
user to run as  : quagga
group to run as  : quagga
group for vty sockets :
config file mask        : 0600
log file mask           : 0600
- Zebra
- Copy sample to conf file:
- cd /opt/quagga
- cp zebra.conf.sample zebra.conf
- Start zebra daemon, you use this command
- sudo /opt/quagga/sbin/zebra &
- Check the daemon zebra:
- netstat -a | grep zebra
- Get into the zebra, you use
- telnet localhost zebra
- BGP
- Copy sample to conf file:
- cd /opt/quagga
- cp bgpd.conf.sample bgpd.conf
- Start bgpd:
- sudo /opt/quagga/sbin/bgpd &
- Check the daemon zebra:
- netstat -a | grep bgpd
- Get into the bgpd, you use
- telnet localhost bgpd
- vtysh
- cd /opt/quagga
- vi /opt/quagga/vtysh.conf
- sudo /opt/quagga/bin/vtysh
! Sample configuration file for vtysh.
!
!service integrated-vtysh-config
hostname quagga-router
username root nopassword
!
- sudo kill `cat /opt/quagga/bgpd.pid`
Port Number:
- zebra: 2601
- ripd: 2602
- ripng: 2603
- ospfd: 2604
- bgpd: 2605
- ospf6d: 2606
Reference:
http://openmaniak.com/quagga_tutorial.php
http://openmaniak.com/quagga_tutorial.php
Tuesday, November 12, 2013
[EVB] What is EVB?
The introduction of EVB
http://networkerhere.blogspot.tw/2012/11/impact-of-server-virtualization-on_13.html
http://blog.ipspace.net/2011/05/edge-virtual-bridging-evb-8021qbg-eases.html
Due to overlay network, EVB is becoming to die ...!? The most main reason is that VLAN is not able to scale:
http://blog.ipspace.net/2012/02/edge-virtual-bridging-8021qbg.html
There are also some similar approaches, such as, VN-Tags that can do the same thing as EVB.
http://www.definethecloud.net/access-layer-network-virtualization-vn-tag-and-vepa/
Friday, November 8, 2013
[Puppet] The studying track of Puppet
After taking some time to study Puppet a while, I become to believe more and more that it is a great auto configuration tool. The following URLs are my studying track of Puppet.
For the beginner, it is recommended to walk through for learning the basic concept
Learning Puppet
http://docs.puppetlabs.com/learning/index.html
Once you finish the above document, you probably want to do your own type and provider. Here you go:
Customer Type
http://docs.puppetlabs.com/guides/custom_types.html
Provider Development
http://docs.puppetlabs.com/guides/provider_development.html
Juniper provides its open source project for using Puppet to manage and configure the switches that support Puppet Agent. It is a very good example for you to understand how to define customer type and to implement provider.
To define customer type:
https://github.com/NetdevOps/puppet-netdev-stdlib
To implement provider:
https://github.com/Juniper/puppet-netdev-stdlib-junos
Monday, November 4, 2013
[OpenFlow 1.X] The Flow Table Usage
When OpenFlow 1.0 guys try to reach the version 1.1 or more, the first question coming up with would most likely be "how to use multi-flow tables ?" Well, we could see an example in RYU OpenFlow Controller as follow: http://www.slideshare.net/yamahata/ryu-sdnframeworkupload
In page 33, there are 3 flow tables which contains match conditons and actions. It can give an initial idea for that question.
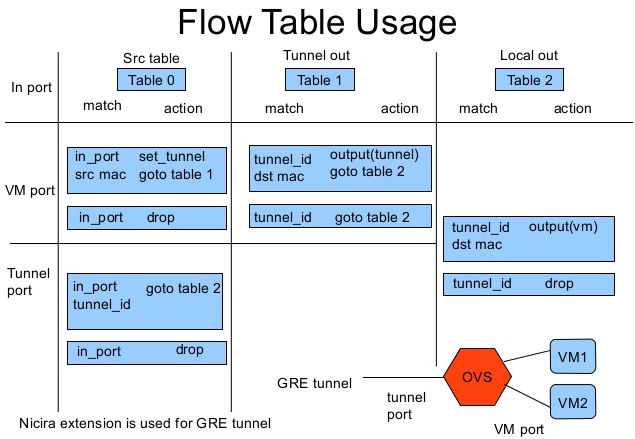
P.S: Pica8 works with Broadcom to double flow table size in its OF1.3 Switch
http://searchsdn.techtarget.com/news/2240214709/Pica8-doubles-flow-rule-capacity-in-its-new-OpenFlow-13-switch
In page 33, there are 3 flow tables which contains match conditons and actions. It can give an initial idea for that question.
P.S: Pica8 works with Broadcom to double flow table size in its OF1.3 Switch
http://searchsdn.techtarget.com/news/2240214709/Pica8-doubles-flow-rule-capacity-in-its-new-OpenFlow-13-switch
Subscribe to:
Posts (Atom)