Thursday, May 26, 2016

[Proxy ARP] What is Proxy ARP?

Why I mention Proxy ARP is because in OpenStack environment, this function exists in FIP namespace with DVR enabled. The way to check whether the FIP namespace's Proxy ARP enabled is here:
# ip netns exec fip-545b57e2-0fa5-46da-89a2-591f7a5474ce cat /proc/sys/net/ipv4/conf/fg-2f3f4992-23/proxy_arp
1

We also can see the arp and ip mapping:
# ip netns exec fip-545b57e2-0fa5-46da-89a2-591f7a5474ce ip neighbor
10.12.20.32 dev fpr-6ddabb95-1 lladdr 42:72:88:ca:07:72 STALE

The following is the explaination about Proxy ARP
http://linux-ip.net/html/ether-arp-proxy.html

Occasionally, an IP network must be split into separate segments. Proxy ARP can be used for increased control over packets exchanged between two hosts or to limit exposure between two hosts in a single IP network. The technique of proxy ARP is commonly used to interpose a device with higher layer functionality between two other hosts. From a practical standpoint, there is little difference between the functions of a packet-filtering bridge and a firewall performing proxy ARP. The manner by which the interposed device receives the packets, however, is tremendously different.

Example 2.10. Proxy ARP Network Diagram


The device performing proxy ARP (masq-gw) responds for all ARP queries on behalf of IPs reachable on interfaces other than the interface on which the query arrives.

FIXME; manual proxy ARP (see also Section 9.3, “Breaking a network in two with proxy ARP”), kernel proxy ARP, and the newly supported sysctl net/ipv4/conf/$DEV/medium_id.

For a brief description of the use of medium_id, see Julian's remarks.

FIXME; Kernel proxy ARP with the sysctl net/ipv4/conf/$DEV/proxy_arp.

Wednesday, May 11, 2016

[Docker] the first experience with building docker image

It is essential to look for the docker image first if you need some services or functions running on docker container. But, once you want to customize it, you probably need to build your own docker image. The official document gives you a very complete description for you to do so. Please refer to this https://docs.docker.com/engine/userguide/containers/dockerimages/
The following command list are my steps to build a customized Drupal docker image.
The are two ways to build your own image:

1. Updating and committing an image

First, it would be better to have a Docker Hub account like this:


Second, to create a repository for your docker image.


If it's done, you can see this:


So, we can continue to the next step.
# Download the offical Drupal docker image
$ docker search drupal
$ docker pull drupal
$ docker images

# Create a container and update it ( be aware of the follwing parameters )
$ docker run -i -t --name danny_drupal -p 8000:80 drupal /bin/bash
  -i, --interactive               Keep STDIN open even if not attached
  -t, --tty                       Allocate a pseudo-TTY
  -p, --publish=[]                Publish a container's port(s) to the host

# From now on, you can go anything for your container
root@2a0849519c71:/var/www/html# apt-get update
root@2a0849519c71:/var/www/html# apt-get install openssh-server cloud-init -y
root@2a0849519c71:/var/www/html# exit

# To commit my changes
$  docker commit -m "Added my services" -a "teyenliu" \
danny_drupal teyenliu/drupal:v1

# Have to login docker before you push your change
$ docker login --username=teyenliu
$ docker push teyenliu/drupal

# Now it is successful to push your own drupal image and you also can see it on docker hub:


# To test your own drupal image:
$ docker run --name danny_drupal -p 8000:80 -d teyenliu/drupal:v1

# To check if the container is running
$ docker ps

# Open your browser with http://127.0.0.1:8000


2. Buidling an image from Dockerfile

$ vim Dockerfile
# This is a comment
FROM drupal:latest
MAINTAINER TeYen Liu <teyen.liu@gmail.com>
RUN apt-get update && apt-get install -y git
RUN apt-get install -y openssh-server
RUN apt-get install -y cloud-init
$ docker build -t teyenliu/drupal:v2 .
$ docker push teyenliu/drupal:v2

# The drupal repository will append the image of tag:v2


P.S: If you want to put the docker image to OpenStack Glance for further using, here is an example command:
$ docker save teyenliu/drupal | glance image-create --container-format docker --disk-format raw --name teyenliu/druapl

Tuesday, May 3, 2016

[Python] Problem with Python logging RotatingFileHandler in Django website

If seeing the log files are not rotated properly or correctly in Django web site, you most likely encounter the problem as the following article described:

Problem with Python logging RotatingFileHandler in Django website
"The log is done via RotatingFileHandler which is configured with 10 log files, 1000000 byte each. The log system works, but this are the log files I get:
-rw-r--r-- 1 apache      apache          83 Jul 23 13:30 hr.log
-rw-r--r-- 1 apache      apache      446276 Jul 23 13:03 hr.log.1
-rw-r--r-- 1 apache      apache      999910 Jul 23 06:00 hr.log.10
-rw-r--r-- 1 apache      apache         415 Jul 23 16:24 hr.log.2
-rw-r--r-- 1 apache      apache      479636 Jul 23 16:03 hr.log.3
-rw-r--r-- 1 apache      apache         710 Jul 23 15:30 hr.log.4
-rw-r--r-- 1 apache      apache      892179 Jul 23 15:03 hr.log.5
-rw-r--r-- 1 apache      apache         166 Jul 23 14:30 hr.log.6
-rw-r--r-- 1 apache      apache      890769 Jul 23 14:03 hr.log.7
-rw-r--r-- 1 apache      apache      999977 Jul 23 12:30 hr.log.8
-rw-r--r-- 1 apache      apache      999961 Jul 23 08:01 hr.log.9
As you can see it is a mess. Last log has been written to file hr.log.2 (Jul 23 16:24) instead of hr.log"

I did some survey and found the root cause is in here:
RotatingFileHandler bugs/errors and a general logging question
"The logging system is thread-safe but not safe
against multiple processes (separate Python instances) writing to the
same file. It certainly sounds like you need a scalable solution - and
having each script send the events to a network logging server seems a
good way of handling the scalability requirement. "

    These words above remind me a lot about the importance of synchronization when using multi-threading and multi-process. Also, scaling is another important item that a lot of people don't care. I want to highlight that we should be vigilant about these.

So, it is not your fault. Don't blame yourself. ( Sorry, I am kidding you ... )
Here is one solution for this issue. Please check out the following link ( it's written in Chinese ):
http://www.djangochina.cn/forum.php?mod=viewthread&tid=118752

[Linux Bonding] 802.3ad bond interface has shown RX dropped packets

If someone uses Linux Bonding and finds some or a lot of RX dropped packets in bond interface, please ignore these dropped packet message because of the following informations:

1. Linux Bonding and Single Nic with 1GE switch are no difference in packet loss
I use iperf tool with UDP to test packet drop and jitter and the result shows that there are no difference of packet loss between linux bonding and single nic.


2. Bond0 RX packet dropped is not a bug.
Please check out this: https://bugs.launchpad.net/ubuntu/+source/bridge-utils/+bug/1041070
This is related to the bonding mode and _not_ a bug. The bonding module will drop duplicate frames received on inactive ports, which is normal behavior. [0] Overall the packets should be getting into the machine without problems since they are received on the active slave. To confirm this do the following

1) Check dropped packets from all interfaces. So if eth0/eth1 are connected to bond0, we may see dropped packets for bond0 and eth0, but not for eth1. This depends on which interface is the active interface. This can be checked using the following:
cat /sys/class/net/bond0/bonding/active_slave

So if the active_slave isn't dropping packets, and the inactive slave is dropping packets this is normal in 'active-backup' mode (or any mode where there is an inactive slave).

2) If we want both interfaces to not drop packets we can use 'all_slaves_active' bonding module parameter [0].
Check:
cat /sys/class/net/bond0/bonding/all_slaves_active, it should default to 0 which means drop frames on the inactive slave.

If we set this to 1, we will no longer drop frames:
echo 1 | sudo tee /sys/class/net/bond0/bonding/all_slaves_active
3. This article suggests to turn off rp_filter ( could reduce RX dropped )
https://platform9.com/support/neutron-prerequisites-linuxkvm-overlays-vxlangre-vlans/
echo net.ipv4.conf.all.rp_filter=0 >> /etc/sysctl.conf
echo net.ipv4.conf.default.rp_filter=0 >> /etc/sysctl.conf
echo net.bridge.bridge-nf-call-iptables=1 >> /etc/sysctl.conf
echo net.ipv4.ip_forward=1 >> /etc/sysctl.conf
sysctl -p
What is reverse path filtering?

Reverse path filtering is a mechanism adopted by the Linux kernel, as well as most of the networking devices out there to check whether a receiving packet source address is routable.

So in other words, when a machine with reverse path filtering enabled recieves a packet, the machine will first check whether the source of the recived packet is reachable through the interface it came in.

If it is routable through the interface which it came, then the machine will accept the packet
If it is not routable through the interface, which it came, then the machine will drop that packet.


Other References:
https://bugs.launchpad.net/fuel/+bug/1471647
https://bugs.launchpad.net/fuel/+bug/1539586

Thursday, March 24, 2016

[Ansible] My first step to use Ansible

Before get started to use Ansible, you need to add public ssh key to your remote Server first. If you want to setup SSH keys to allow logging in without a password, you can do so with a single command.
The first thing you’ll need to do is make sure you’ve run the keygen command to generate the keys:

ssh-keygen -t rsa
Then use this command to push the key to the remote server, modifying it to match your server name.
cat ~/.ssh/id_rsa.pub | ssh user@hostname 'cat >> .ssh/authorized_keys'

So, from now on you are able to try Ansible to control your remote server.

# sudo pip install ansible
# sudo mkdir /etc/ansible
# cd /etc/ansible/
# vim hosts
  ==> [my_vm]
          2 10.14.1.106

# ansible my_vm --private-key=/home/liudanny/.ssh/id_rsa --user=ubuntu -m ping
or 
# ansible my_vm -m ping --user ubuntu
10.14.1.106 | success >> {
    "changed": false,
    "ping": "pong"
}
ansible my_vm --user=ubuntu -a "/bin/echo hello"
10.14.1.106 | success | rc=0 >>
hello

If the above steps work fine, we can follow this document to create an instance and check services on OpenStack. Here you go:
http://superuser.openstack.org/articles/using-ansible-for-continuous-integration-on-openstack

Reference:
OpenStack-Ansible Installation Guide
http://docs.openstack.org/developer/openstack-ansible/install-guide/index.html

http://www.yet.org/2014/07/ansible/

http://rundeck.org/


Thursday, March 17, 2016

[LBaaS] The Load Balance as a Service trace records

A couple of days ago, my colleague imparts Load Balance as a Service (LBaaS) which is the Neutron Plugin to provide the load balancer functionality in OpenStack. Unavoidably, I still like to drill down how it works so that we won't only understand the surface of this function. This article is only focused on the trace record because I have studied the concept of LBaaS. For those who don't know about its concept and implementation, please check out other resources first, ex: https://wiki.openstack.org/wiki/Neutron/LBaaS/Glossary 


  • If created a lb pool ready, you can see something like the following picture. My point is to trace subnet and network port.


  • From the "subnet" link, we can trace back to the its detail and also can go to its network detail by clicking the link of network id.  


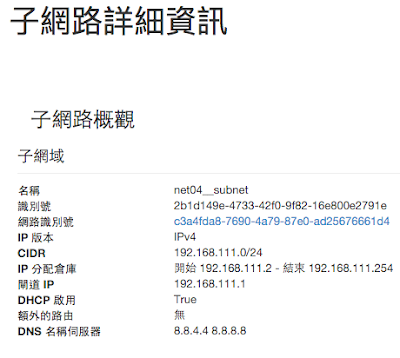
  • Here we can find the vip port that is for our load balancer as follows.

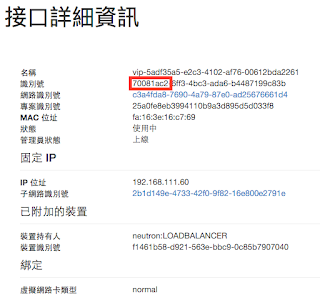
Click it to see its details.


  • Now, we will use the first part of port id (70081ac2) to trace what happens in linux network space and tun/tap interface.


  • LBaaS agent will create a linux network space and the naming rule is "qlbaas-" with the pool's id. 

# ip netns exec qlbaas-13185f35-3f75-47e7-9fd7-301be7b28e88 ifconfig
lo        Link encap:Local Loopback
          inet addr:127.0.0.1  Mask:255.0.0.0
          inet6 addr: ::1/128 Scope:Host
          UP LOOPBACK RUNNING  MTU:65536  Metric:1
          RX packets:0 errors:0 dropped:0 overruns:0 frame:0
          TX packets:0 errors:0 dropped:0 overruns:0 carrier:0
          collisions:0 txqueuelen:0
          RX bytes:0 (0.0 B)  TX bytes:0 (0.0 B)

tap70081ac2-6f Link encap:Ethernet  HWaddr fa:16:3e:16:c7:69
          inet addr:192.168.111.60  Bcast:192.168.111.255  Mask:255.255.255.0
          inet6 addr: fe80::f816:3eff:fe16:c769/64 Scope:Link
          UP BROADCAST RUNNING MULTICAST  MTU:1500  Metric:1
          RX packets:15963 errors:0 dropped:0 overruns:0 frame:0
          TX packets:15762 errors:0 dropped:0 overruns:0 carrier:0
          collisions:0 txqueuelen:0
          RX bytes:958766 (958.7 KB)  TX bytes:1060728 (1.0 MB)

# ip netns exec qlbaas-13185f35-3f75-47e7-9fd7-301be7b28e88 route -n
Kernel IP routing table
Destination     Gateway         Genmask         Flags Metric Ref    Use Iface
0.0.0.0         192.168.111.1   0.0.0.0         UG    0      0        0 tap70081ac2-6f
192.168.111.0   0.0.0.0         255.255.255.0   U     0      0        0 tap70081ac2-6f

  • The tap interface is ported to OVS bridge: br-int
# ovs-vsctl show | grep 7008
        Port "tap70081ac2-6f"
            tag: 1
            Interface "tap70081ac2-6f"
                type: internal


  • I didn't cover the HAProxy software because my point is only on tun/tap interface and Linux network space. But, how do I find the HAProxy process running on this network space?

# netns=qlbaas-13185f35-3f75-47e7-9fd7-301be7b28e88
# find -L /proc/[1-9]*/task/*/ns/net -samefile /run/netns/"$netns" | cut -d/ -f5
19937 <== the process id

# ps aux | grep 19937
root     14216  0.0  0.0  10432   932 pts/0    S+   02:29   0:00 grep --color=auto 19937
nobody   19937  0.0  0.0  29176  1472 ?        Ss   Mar16   0:06 haproxy -f /var/lib/neutron/lbaas/13185f35-3f75-47e7-9fd7-301be7b28e88/conf -p /var/lib/neutron/lbaas/13185f35-3f75-47e7-9fd7-301be7b28e88/pid -sf 8433

# ip netns identify 19937
qlbaas-13185f35-3f75-47e7-9fd7-301be7b28e88 <== where the namespace the process id is in

Get it. Here we go. So, put all the information together and then we can more understand how LBaaS implements.

Tuesday, March 1, 2016

[Fuel] How to use postgres database in Fuel

For those who wants to check out the data in Fuel's Postgres database, this document can give a simple guide to do so for the reference.
Here it is:

Find out the postgres docker

[root@fuel /]# docker ps


[root@fuel /]dockerctl fuel-core-7.0-psotgres shell
[root@fuel /]# sudo su - postgres
-bash-4.1$ psql
psql (9.3.5)
Type "help" for help.

postgres=#

So, now we can use postgres sql database!

Use "nailgun" database

postgres=# \c nailgun
You are now connected to database "nailgun" as user "postgres".

List all tables in database

nailgun=# \dt

Look "tasks" table schema

nailgun=# \d tasks       
           

Use SQL to select the data in table

nailgun=# select * from information_schema.columns where table_name = tasks;