Monday, August 3, 2015

[Linux] “No such file or directory” on files that exist?

First, this kind of problem is almost related with dynamic loader. You can check out what it is:
To understand Linux Dynamic Loader
http://www.cs.virginia.edu/~dww4s/articles/ld_linux.html

After verifying it with several ways:
# file "your binary"
# readelf -l  "your binary"
# strings "your binary" | grep ld-

Then you can find out which dynamic loader your binary uses.
For my case, I just create a symbolic link to my loader, and then it works.
liudanny@Debian7 x64_lsb $ ll /lib64/
total 8
drwxr-xr-x  2 root root 4096 Aug  2 20:49 .
drwxr-xr-x 24 root root 4096 Jun 20 18:14 ..
lrwxrwxrwx  1 root root   32 Feb 22 06:41 ld-linux-x86-64.so.2 -> /lib/x86_64-linux-gnu/ld-2.13.so
lrwxrwxrwx  1 root root   20 Aug  2 20:49 ld-lsb-x86-64.so.3 -> ld-linux-x86-64.so.2

I also find some other issue about running a 32-bit binary on a 64-bit system. Here is a good answer in the following link:
Quote:
"But the program is a 32-bit program (as the file output indicates), looking for the 32-bit loader /lib/ld-linux.so.2, and you've presumably only installed the 64-bit loader /lib64/ld-linux-x86-64.so.2 in the chroot."
http://unix.stackexchange.com/questions/13391/getting-not-found-message-when-running-a-32-bit-binary-on-a-64-bit-system


To install ia32-libs on debian wheezy amd64:
dpkg --add-architecture i386 
apt-get update
apt-get install libc6:i386
or:
sudo dpkg --add-architecture i386
sudo apt-get update
sudo aptitude install ia32-libs

Wednesday, July 29, 2015

[Python] Effective Python

Two weeks ago, my friend discussed the best practice for Django and Python in programming.
After that for a while, one day I just came up with a idea: I read a book "Effective C++" and why not there is a book about "Effective Python"? So, here it is: http://www.effectivepython.com/
I wish I can find some time to walk through this book.

Monday, July 27, 2015

[Neutron] Slow network speed between VM and external

Recently I encountered a situation of the VM's network performance that is pretty low. For instance, if upload a image to Glance via my VM to run glance cli command, the actual transmit speed is around the following data:
RX: 130 Kbps
TX: 150 Kbps

My OpenStack's network service is with GRE segmentation on Neutron. Why? After google the web, I found some people had the same issues as I had:

They talked about the approach on the VM to solve the issue and this works
> ethtool -K eth0 gro off
> ethtool -K eth0 tso off

But, for my case I think it is not solve from the root cause so that I take time to do the research for TCP segmentation offload and GRE. Finally I find the root cause:
MTU need to adjust when using GRE network service.
http://docs.openstack.org/juno/install-guide/install/yum/content/neutron-network-node.html
Quote:
"Tunneling protocols such as GRE include additional packet headers that increase overhead and decrease space available for the payload or user data. Without knowledge of the virtual network infrastructure, instances attempt to send packets using the default Ethernet maximum transmission unit (MTU) of 1500 bytes.Internet protocol (IP) networks contain the path MTU discovery (PMTUD) mechanism to detect end-to-end MTU and adjust packet size accordingly. However, some operating systems and networks block or otherwise lack support for PMTUD causing performance degradation or connectivity failure.
Ideally, you can prevent these problems by enabling jumbo frames on the physical network that contains your tenant virtual networks. Jumbo frames support MTUs up to approximately 9000 bytes which negates the impact of GRE overhead on virtual networks. However, many network devices lack support for jumbo frames and OpenStack administrators often lack control over network infrastructure. Given the latter complications, you can also prevent MTU problems by reducing the instance MTU to account for GRE overhead. Determining the proper MTU value often takes experimentation, but 1454 bytes works in most environments. You can configure the DHCP server that assigns IP addresses to your instances to also adjust the MTU."

After doing the following setting on Controller node, the transmit speed is up to:
RX: 31323 Kbps
TX: 31464 Kbps
  1. Edit the /etc/neutron/dhcp_agent.ini file and complete the following action:
    1. In the [DEFAULT] section, enable the dnsmasq configuration file:
      Select Text
      1
      2
      3
      [DEFAULT]
      ...
      dnsmasq_config_file = /etc/neutron/dnsmasq-neutron.conf
  2. Create and edit the /etc/neutron/dnsmasq-neutron.conf file and complete the following action:
    1. Enable the DHCP MTU option (26) and configure it to 1454 bytes:
      Select Text
      1
      dhcp-option-force=26,1454
  3. Kill any existing dnsmasq processes:
    # pkill dnsmasq

So, the network performance is improved 200 times.
Wow...


Reference:
TCP segmentation offload
https://forum.ivorde.com/linux-tso-tcp-segmentation-offload-what-it-means-and-how-to-enable-disable-it-t19721.html
TCP in Linux Kernel
http://vger.kernel.org/~davem/tcp_output.html
Understanding TCP Segmentation Offload (TSO) and Large Receive Offload (LRO) in a VMware environmenthttps://kb.vmware.com/selfservice/microsites/search.do?language=en_US&cmd=displayKC&externalId=2055140


Monday, June 8, 2015

[OF-DPA] A simple L2 switch RYU app for OF-DPA

I found there is a official OF-DPA web site that contains some good information about RYU and OF-DPA as follows:
http://ofdpa.com/

I also put my simple L2 switch RYU app for OF-DPA which I had done an example in the last year and cannot guarantee there is no error/bug. But, it is still worth referencing. Enjoy.
Here it is:
https://github.com/teyenliu/OF-DPA

Wednesday, May 20, 2015

[GIT] The git commands that I often use

I just list the git commands that I often use and keep in this document for reference.


// pull the newest commit from origin
git pull origin "your branch"

// check out to a branch
git checkout "your branch name"

// apply the diff file
git apply "your diff file"

// Check the diff
git diff [your file]

// code commit
git commit -a -m "This is bug."

// push commit to remote site,
git push "your remote site" "your branch"

// repository name
git remote rm origin
git remote add origin git@...git
git remote set-url origin git@...git

// add new remote repository name
git remote add "remote repository name" ssh://.......

//Force to go back the current newest commit
git reset --hard HEAD
HEAD^ // the previous commit
HEAD~2 // the previous two commit
git reset --hard eb2b844 // the previous a commit with your hash code
--soft // the change will be added to stage
--hard // all the change will be deleted

//cancel the modification of some files.
git checkout -- <file>

// modify the last commit
git commit --amend

// reset the change of some files
git reset HEAD <file>

// reset the merge
git reset

// clean up the changes
git cleanup -f

// checkout a branch
git checkout "branch"
// checkout a branch to new branch with track
git checkout -t -b bcm origin/bcm

// look up the commit hash
git log  
                     
// cherry pick the commit
git cherry-pick "hash code"

// push to remote repository
git push remote repository name "branch"


// use GUI to see the diff, commit and branch tree
gitk --all&

// merge the branch to this branch
git merge "branch"

// There are several mergetools, such as, kdiff3/meld/p4merge
// I suggest to use p4merge/meld
// the difftool "p4merge" to see the diff of two commit with the cc files
git difftool -t p4merge aa202d3..be15911907d9 -- *.cc
git mergetool -t p4merge myfile.cc

// keep the temp modification
git stash
// check the stash list
git stash list
// apply the stash
git stash apply --index
// to apply the stash and then immediately drop it from your stack.
git stash pop
// create a branch from a stash
git stash branch "your stash branch name"

// Undo a commit and redo
git commit ...              (1)
git reset --soft HEAD~1     (2)
<< edit files as necessary >> (3)
git add ....                (4)
git commit -c ORIG_HEAD     (5)


// Remove all .pyc or .xxx files
find . -name "*.pyc"; -exec git rm -f {} \;

// Remove a file in remote repository without deleting local file
git rm --cached your_file_here

// Set ignore file:
git config --global core.excludesfile ~/.gitignore_global

// Ignore SSL verification
env GIT_SSL_NO_VERIFY=true git command
or set to config:
git config http.sslVerify "false"

// Get sources after commit id
git checkout 336e1731fd8591c712d029681392e5982b2c7e6b src/abc/*

// *** Avoiding annoying merge commits:
git pull --rebase origin master
git pull --rebase origin

// Avoiding to merge or commit your customised configs:
git update-index --assume-unchanged [filepath]

// Putting back and tracking the files above:
git update-index --no-assume-unchanged [filepath]

Tuesday, May 12, 2015

[Django] The summary of "Writing your first Django app" in offical Django document

Well, if we want to really get understanding something, the best way is to study and do by yourself. The official Django web site gives us a very good example for those who are the first time to use Django. So this article is just the quick summary of this "Writing your first Django app" as follows:

Writing your first Django app, part 1
Writing your first Django app, part 2
Writing your first Django app, part 3
Writing your first Django app, part 4
Writing your first Django app, part 5
Writing your first Django app, part 6
Advanced tutorial: How to write reusable apps

$ django-admin startproject r300
$ python -m django --version
$ python -c "import django; print(django.get_version())"
$ django-admin startproject R300
$ python manage.py startapp demo
$ python manage.py migrate
$ python manage.py runserver 0.0.0.0:8000

After finishing the above steps, we can get the file structure like the picture below:


This picture is about the polls application that looks like:

And this picture is about the admin application that is to manage polls data:


If you want to deploy this polls application to Apache web server with mod_wsgi module, please follow the previous article to install Apache and mod_wsgi. Then, we need to add the setting of /etc/apache2/site-available/default is as follows:


But, in this case, I have not resolved the permission for database and admin application. So, hope to fix these later.

P.S:
There is a very good django e-book as follows:
http://www.djangobook.com/en/2.0/index.html


[Apache] Install Apache2 and mod_wsgi module

Install Apache Web Server
sudo apt-get install apache2 apache2-threaded-dev apache2-doc apache2-utils

  • Edit the main Apache configuration file to adjust the resource use settings.
    • /etc/apache2/apache2.conf


Install Support for Scripting ( Python )
sudo apt-get install libapache2-mod-python

  • An easy way to see which modules are installed is to run a list command on the directory:
    • ls -al /etc/apache2/mods-available/


  • To enable an installed module, run the following command:
    • a2enmod [module-name]


Install Apache Modules
sudo apt-get install libapache2-mod-wsgi

or to follow this intruction to compile and install from the source code:
https://code.google.com/p/modwsgi/wiki/QuickInstallationGuide

Operate Apache Web Server
  • sudo apachectl restart
  • sudo apachectl stop
  • sudo apachectl start

Give a try with WSGI 

  • Add the following setting to /etc/apache2/sites-available/default

WSGIScriptAlias /myapp /home/liudanny/django_proj/myapp.py

<Directory /home/liudanny/django_proj>
    Order allow,deny
    Allow from all
</Directory>


  • Add a wsgi file: /home/liudanny/django_proj/myapp.py

def application(environ, start_response):
    status = '200 OK'
    output = 'Hello World!'

    response_headers = [('Content-type', 'text/plain'),
                    ('Content-Length', str(len(output)))]
    start_response(status, response_headers)
    return [output]


Ref:
https://www.linode.com/docs/websites/apache/apache-2-web-server-on-debian-7-wheezy
https://docs.djangoproject.com/en/1.8/howto/deployment/wsgi/modwsgi/

Wednesday, May 6, 2015

[Python] A simple example of Python Egg

The following content is based on this article:
http://www.mxm.dk/2008/02/python-eggs-simple-introduction.html

hello/
  _wrapper.so
  hello.py ==>
    def helloworld():
        print 'Hello World'


1. First, prepare your setup.py ==>
from distutils.core import setup # Distutils

setup(name='hello',
    version='1.0',
    packages=['hello',],
    package_data={
        'hello': ['*.so'],
    }
)

2. Run python setup.py sdist

3. Change a line in your setup.py ==>
#from distutils.core import setup # Distutils
from setuptools import setup, find_packages # Egg

setup(name='hello',
    version='1.0',
    packages=['hello',],
    package_data={
        'hello': ['*.so'],
    }
)

4. Run  python setup.py bdist_egg

5. Then you get a new file in your dist directory:
dist/
hello-1.0-py2.4.egg

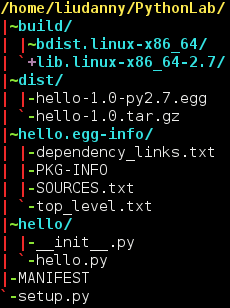
My example files and output package are here:


6. To install the egg file
> sudo easy_install hello-1.0-py2.7.egg
in case if there is an error for easy_install
> sudo apt-get install python-setuptools