
Monday, July 9, 2018
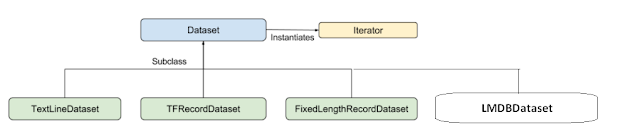
[TensorFlow] How to implement LMDBDataset in tf.data API?
I have finished implementing the LMDBDataset in tf.data API. It could be not the bug-free component, but at least it's my first time to try to implement C++ and Python function in TensorFlow. The API architecture looks like this:
Thursday, July 5, 2018
[TensorFlow] How to build your C++ program or application with TensorFlow library using CMake
When you want to build your C++ program or application using TensorFlow library or functions, you probably will encounter some header file missed issues or linking problems. Here is the step list that I have verified and it works well.
1. Prepare TensorFlow ( v1.10) and its third party's library
2. Modify .tf_.tf_configure.bazelrc
1. Prepare TensorFlow ( v1.10) and its third party's library
$ git clone --recursive https://github.com/tensorflow/tensorflow
$ cd tensorflow/contrib/makefile
$ ./build_all_linux.sh
2. Modify .tf_.tf_configure.bazelrc
$ cd tensorflow/
$ vim .tf_configure.bazelrc
  append this line in the bottom of the file
  ==>
  build --define=grpc_no_ares=true
Wednesday, June 27, 2018
[XLA JIT] How to turn on XLA JIT compilation at multiple GPUs training
Before I discuss this question, let's recall how to turn on XLA JIT compilation and use it in TensorFlow python API.
1. Session
Turning on JIT compilation at the session level will result in all possible operators being greedily compiled into XLA computations. Each XLA computation will be compiled into one or more kernels for the underlying device.
1. Session
Turning on JIT compilation at the session level will result in all possible operators being greedily compiled into XLA computations. Each XLA computation will be compiled into one or more kernels for the underlying device.
Monday, June 25, 2018
[PCIe] How to read/write PCIe Switch Configuration Space?

Thursday, June 21, 2018
[TensorFlow] How to get CPU configuration flags (such as SSE4.1, SSE4.2, and AVX...) in a bash script for building TensorFlow from source
The AVX and SSE4.2 and others are offered by Intel CPU. (AVX and SSE4.2 are CPU infrastructures for faster matrix computations) Did you wonder what CPU configuration flags (such as SSE4.1, SSE4.2, and AVX...) you should use on your machine when building Tensorflow from source? If so, here is a quick solution for you.
[TensorFlow 記憶體優化實驗] Compare the memory options in Grappler Memory Optimizer
As we know that in Tensorflow, there is an optimization module called "Grappler". It provides many kinds of optimization functionalities, such as: Layout, Memory, ModelPruner, and so on... In this experiment, we can see the effect of some memory options enabled in a simple CNN model using MNIST dataset.
Thursday, June 14, 2018
[XLA 研究] How to use XLA AOT compilation in TensorFlow
This document is going to explain how to use AOT compilation in TensorFlow. We will use the tool: tfcompile, which is a standalone tool that ahead-of-time (AOT) compiles TensorFlow graphs into executable code. It can reduce the total binary size, and also avoid some runtime overheads. A typical use-case of tfcompile is to compile an inference graph into executable code for mobile devices. The following steps are as follows:
1. Build tool: tfcompile
1. Build tool: tfcompile
> bazel build --config=opt --config=cuda //tensorflow/compiler/aot:tfcompile
Friday, June 8, 2018
[XLA 研究] Take a glance to see the graph changes in XLA JIT compilation
In the preamble of this article, to understand XLA JIT is pretty hard because you probably need to understand TensorFlow Graph, Executor, LLVM, and math... I have been through this painful study work somehow so that I hope my experience can help for those who are interested in XLA but have not get understood yet.
Thursday, June 7, 2018
[TX2 研究] My first try on Jetson TX2
I got a Jetson TX2 several days ago from my friend and it looks like following pictures. I setup it using Nivida's installing tool: JetPack-L4T-3.2 version (JetPack-L4T-3.2-linux-x64_b196.run). During the installation, I indeed encounter some issues with not abling to setup IP address on TX2, and I resolved it. If anyone still has this issue, let me know and I will post another article to explain the resolving steps.
Wednesday, August 30, 2017
[Caffe] Try out Caffe with Python code
This document is just a testing record to try out on Caffe with Python code. I refer to this blog. For using Python, we can easily to access every data flow blob in layers, including diff blob, weight blob and bias blob. It is so convenient for us to understand the change of training phase's weights and what have done in each step.
Monday, August 7, 2017
[Caffe] How to use Caffe to solve the regression problem?
There is a question coming up to my mind recently. How to use Caffe to solve the regression problem? We used to see a bunch of examples related to image recognition with labels and they are classification problem. In my experience, I have done this problem using TensorFlow, not Caffe. But, I think in theory they are both the same. The key point is using EuclideanLossLayer as the final Loss Layer and it's the detail from the official web site:
Wednesday, August 2, 2017
[Raspberry Pi] Use Wireless and Ethernet together
The following content is my Raspberry Pi 3's setting in /etc/network/interface as follows. In my case, I both use wireless and ethernet device at the same time.
# Include files from /etc/network/interfaces.d:
source-directory /etc/network/interfaces.d

auto lo
iface lo inet loopback

auto wlan0
allow-hotplug wlan0
iface wlan0 inet manual
    Wpa-conf /etc/wpa_supplicant/wpa_supplicant.conf

allow-hotplug eth0
iface eth0 inet static
    address 140.96.29.224
    netmask 255.255.255.0
    up ip route add 100.85.0.0/24 via 140.96.29.254 dev eth0
    up ip route add 140.96.29.0/24 via 140.96.29.254 dev eth0
up ip route add 140.96.98.0/24 via 140.96.29.254 dev eth0[Debug] Debugging Python and C++ exposed by boost together
During the studying of Caffe, I was curious about how Caffe provides Python interface and what kind of tool uses for wrapping. Then, the answer is Boost.Python. I think for C++ developer, it is worth time to learn and I will study it sooner. In this post, I want to introduce the debugging skill which I found in this post and I believe these are very useful such as debugging Caffe with Python Layer. Here is the link:
https://stackoverflow.com/questions/38898459/debugging-python-and-c-exposed-by-boost-together
https://stackoverflow.com/questions/38898459/debugging-python-and-c-exposed-by-boost-together
Tuesday, July 18, 2017
[PCIe] lspci command and the PCIe devices in my server
The following content is about my PCIe devices/drivers and the lspci command results.
$ cd /sys/bus/pci_express/drivers
$ ls -al
drwxr-xr-x 2 root root 0 7月 6 15:33 aer/
drwxr-xr-x 2 root root 0 7月 6 15:33 pciehp/
drwxr-xr-x 2 root root 0 7月 6 15:33 pcie_pme/
Thursday, May 18, 2017
[Caffe] Install Caffe and the depended packages
This article is just for me to quickly record the all the steps to install the depended packages for Caffe. So, be careful that it maybe is not good for you to walk through them in your environment. ^_^
# Install CCMAKE
$ sudo apt-get install cmake-curses-guiMonday, May 15, 2017
[NCCL] Build and run the test of NCCL
NCCL requires at least CUDA 7.0 and Kepler or newer GPUs. Best performance is achieved when all GPUs are located on a common PCIe root complex, but multi-socket configurations are also supported.
Note: NCCL may also work with CUDA 6.5, but this is an untested configuration.
Build & run
To build the library and tests.$ cd nccl
$ make CUDA_HOME=<cuda install path> test
Test binaries are located in the subdirectories nccl/build/test/{single,mpi}.
$ ~/git/nccl$ export LD_LIBRARY_PATH=$LD_LIBRARY_PATH:./build/lib
$ ~/git/nccl$ ./build/test/single/all_reduce_test 100000000
# Using devices
# Rank 0 uses device 0 [0x04] GeForce GTX 1080 Ti
# Rank 1 uses device 1 [0x05] GeForce GTX 1080 Ti
# Rank 2 uses device 2 [0x08] GeForce GTX 1080 Ti
# Rank 3 uses device 3 [0x09] GeForce GTX 1080 Ti
# Rank 4 uses device 4 [0x83] GeForce GTX 1080 Ti
# Rank 5 uses device 5 [0x84] GeForce GTX 1080 Ti
# Rank 6 uses device 6 [0x87] GeForce GTX 1080 Ti
# Rank 7 uses device 7 [0x88] GeForce GTX 1080 Ti
# out-of-place in-place
# bytes N type op time algbw busbw res time algbw busbw res
100000000 100000000 char sum 30.244 3.31 5.79 0e+00 29.892 3.35 5.85 0e+00
100000000 100000000 char prod 30.493 3.28 5.74 0e+00 30.524 3.28 5.73 0e+00
100000000 100000000 char max 29.745 3.36 5.88 0e+00 29.877 3.35 5.86 0e+00
100000000 100000000 char min 29.744 3.36 5.88 0e+00 29.868 3.35 5.86 0e+00
100000000 25000000 int sum 29.692 3.37 5.89 0e+00 29.754 3.36 5.88 0e+00
100000000 25000000 int prod 30.733 3.25 5.69 0e+00 30.697 3.26 5.70 0e+00
100000000 25000000 int max 29.871 3.35 5.86 0e+00 29.700 3.37 5.89 0e+00
100000000 25000000 int min 29.809 3.35 5.87 0e+00 29.852 3.35 5.86 0e+00
100000000 50000000 half sum 28.590 3.50 6.12 1e-02 27.545 3.63 6.35 1e-02
100000000 50000000 half prod 27.416 3.65 6.38 1e-03 27.375 3.65 6.39 1e-03
100000000 50000000 half max 30.811 3.25 5.68 0e+00 30.670 3.26 5.71 0e+00
100000000 50000000 half min 30.818 3.24 5.68 0e+00 30.931 3.23 5.66 0e+00
100000000 25000000 float sum 29.719 3.36 5.89 1e-06 29.750 3.36 5.88 1e-06
100000000 25000000 float prod 29.741 3.36 5.88 1e-07 30.029 3.33 5.83 1e-07
100000000 25000000 float max 28.400 3.52 6.16 0e+00 28.400 3.52 6.16 0e+00
100000000 25000000 float min 28.364 3.53 6.17 0e+00 28.434 3.52 6.15 0e+00
100000000 12500000 double sum 33.989 2.94 5.15 0e+00 34.104 2.93 5.13 0e+00
100000000 12500000 double prod 33.895 2.95 5.16 2e-16 33.833 2.96 5.17 2e-16
100000000 12500000 double max 30.228 3.31 5.79 0e+00 30.273 3.30 5.78 0e+00
100000000 12500000 double min 30.324 3.30 5.77 0e+00 30.341 3.30 5.77 0e+00
100000000 12500000 int64 sum 29.914 3.34 5.85 0e+00 30.036 3.33 5.83 0e+00
100000000 12500000 int64 prod 30.975 3.23 5.65 0e+00 31.083 3.22 5.63 0e+00
100000000 12500000 int64 max 29.954 3.34 5.84 0e+00 29.949 3.34 5.84 0e+00
100000000 12500000 int64 min 29.946 3.34 5.84 0e+00 29.952 3.34 5.84 0e+00
100000000 12500000 uint64 sum 29.981 3.34 5.84 0e+00 30.100 3.32 5.81 0e+00
100000000 12500000 uint64 prod 30.911 3.24 5.66 0e+00 30.800 3.25 5.68 0e+00
100000000 12500000 uint64 max 29.890 3.35 5.85 0e+00 29.947 3.34 5.84 0e+00
100000000 12500000 uint64 min 29.929 3.34 5.85 0e+00 29.964 3.34 5.84 0e+00
Out of bounds values : 0 OK
Avg bus bandwidth : 5.81761
[Mpld3] Render Matplotlib chart to web using Mpld3
The following example is about rendering a matplotlib chart on web, which is based on Django framework to build up. I encountered some problems before, such as, not able to see chart on the web page or having a run-time error after reloading the page. But, all the problems are solved.
import numpy as np
import mpld3
def plot_test1(request):
context = {}
fig, ax = plt.subplots(subplot_kw=dict(axisbg='#EEEEEE'))
N = 100
"""
Demo about using matplotlib and mpld3 to rendor charts
"""
scatter = ax.scatter(np.random.normal(size=N),
np.random.normal(size=N),
c=np.random.random(size=N),
s=1000 * np.random.random(size=N),
alpha=0.3,
cmap=plt.cm.jet)
ax.grid(color='white', linestyle='solid')
ax.set_title("Scatter Plot (with tooltips!)", size=20)
labels = ['point {0}'.format(i + 1) for i in range(N)]
tooltip = mpld3.plugins.PointLabelTooltip(scatter, labels=labels)
mpld3.plugins.connect(fig, tooltip)
#figure = mpld3.fig_to_html(fig)
figure = json.dumps(mpld3.fig_to_dict(fig))
context.update({ 'figure' : figure })
"""
Demo about using tensorflow to predict the result
"""
num = np.random.randint(100)
prediction = predict_service.predict(num)
context.update({ 'num' : num })
context.update({ 'prediction' : prediction })
return render(request, 'demo/demo.html', context)
<script type="text/javascript" src="http://mpld3.github.io/js/mpld3.v0.2.js"></script>
<style>
/* Move down content because we have a fixed navbar that is 50px tall */
body {
padding-top: 50px;
padding-bottom: 20px;
}
</style>
<html>
<div id="fig01"></div>
<script type="text/javascript">
figure = {{ figure|safe }};
mpld3.draw_figure("fig01", figure);
</script>
</html>
So, we can see the result as follows:
<< demo/views.py>>
import matplotlib.pyplot as pltimport numpy as np
import mpld3
def plot_test1(request):
context = {}
fig, ax = plt.subplots(subplot_kw=dict(axisbg='#EEEEEE'))
N = 100
"""
Demo about using matplotlib and mpld3 to rendor charts
"""
scatter = ax.scatter(np.random.normal(size=N),
np.random.normal(size=N),
c=np.random.random(size=N),
s=1000 * np.random.random(size=N),
alpha=0.3,
cmap=plt.cm.jet)
ax.grid(color='white', linestyle='solid')
ax.set_title("Scatter Plot (with tooltips!)", size=20)
labels = ['point {0}'.format(i + 1) for i in range(N)]
tooltip = mpld3.plugins.PointLabelTooltip(scatter, labels=labels)
mpld3.plugins.connect(fig, tooltip)
#figure = mpld3.fig_to_html(fig)
figure = json.dumps(mpld3.fig_to_dict(fig))
context.update({ 'figure' : figure })
"""
Demo about using tensorflow to predict the result
"""
num = np.random.randint(100)
prediction = predict_service.predict(num)
context.update({ 'num' : num })
context.update({ 'prediction' : prediction })
return render(request, 'demo/demo.html', context)
<<demo/demo.html>>
<script type="text/javascript" src="http://d3js.org/d3.v3.min.js"></script><script type="text/javascript" src="http://mpld3.github.io/js/mpld3.v0.2.js"></script>
<style>
/* Move down content because we have a fixed navbar that is 50px tall */
body {
padding-top: 50px;
padding-bottom: 20px;
}
</style>
<html>
<div id="fig01"></div>
<script type="text/javascript">
figure = {{ figure|safe }};
mpld3.draw_figure("fig01", figure);
</script>
</html>
So, we can see the result as follows:
[Hadoop] To build a Hadoop environment (a single node cluster)
For the purpose of studying Hadoop, I have to build a testing environment to do. I found some resource links are good enough to build a single node cluster of Hadoop MapReduce as follows. And there are additional changes from my environment that I want to add some comments for my reference.
http://www.thebigdata.cn/Hadoop/15184.html
http://www.powerxing.com/install-hadoop/
$ sbin/start-yarn.sh
Finally, we can try the Hadoop MapReduce example as follows:
$ bin/hadoop jar share/hadoop/mapreduce/hadoop-mapreduce-examples-2.7.0.jar grep input output 'dfs[a-z.]+'
http://www.thebigdata.cn/Hadoop/15184.html
http://www.powerxing.com/install-hadoop/
Login the user "hadoop"
$ sudo su - hadoopGo to the location of Hadoop
$ /usr/local/hadoopAdd the variables in ~/.bashrc
export JAVA_HOME=/usr/lib/jvm/java-7-openjdk-amd64 export HADOOP_HOME=/usr/local/hadoop export HADOOP_CONF_DIR=$HADOOP_HOME/etc/hadoop export HADOOP_INSTALL=/usr/local/hadoop export PATH=$PATH:$HADOOP_INSTALL/bin export PATH=$PATH:$HADOOP_INSTALL/sbin export HADOOP_MAPRED_HOME=$HADOOP_INSTALL export HADOOP_COMMON_HOME=$HADOOP_INSTALL export HADOOP_HDFS_HOME=$HADOOP_INSTALL export YARN_HOME=$HADOOP_INSTALLModify $JAVA_HOME in etc/hadoop/hadoop-env.sh
export JAVA_HOME=/usr/lib/jvm/java-7-openjdk-amd64Start dfs and yarn
$ sbin/start-dfs.sh$ sbin/start-yarn.sh
Finally, we can try the Hadoop MapReduce example as follows:
$ bin/hadoop jar share/hadoop/mapreduce/hadoop-mapreduce-examples-2.7.0.jar grep input output 'dfs[a-z.]+'
[Spark] To install Spark environment based on Hadoop
This document is to record how to install Spark environment based on Hadoop as the previous one. For running Spark in Ubuntu machine, it should install Java first. Using the following command is easily to install Java in Ubuntu machine.
$ sudo apt-get install openjdk-7-jre openjdk-7-jdk
$ dpkg -L openjdk-7-jdk | grep '/bin/javac'
$ /usr/lib/jvm/java-7-openjdk-amd64/bin/javac
So, we can setup the JAVA_HOME environment variable as follows:
$ vim /etc/profile
append this ==> export JAVA_HOME=/usr/lib/jvm/java-7-openjdk-amd64
$ sudo tar -zxf ~/Downloads/spark-1.6.0-bin-without-hadoop.tgz -C /usr/local/
$ cd /usr/local
$ sudo mv ./spark-1.6.0-bin-without-hadoop/ ./spark
$ sudo chown -R hadoop:hadoop ./spark
$ sudo apt-get update
$ sudo apt-get install scala
$ wget http://apache.stu.edu.tw/spark/spark-1.6.0/spark-1.6.0-bin-hadoop2.6.tgz
$ tar xvf spark-1.6.0-bin-hadoop2.6.tgz
$ cd /spark-1.6.0-bin-hadoop2.6/bin
$ ./spark-shell
$ cd /usr/local/spark
$ cp ./conf/spark-env.sh.template ./conf/spark-env.sh
$ vim ./conf/spark-env.sh
append this ==> export SPARK_DIST_CLASSPATH=$(/usr/local/hadoop/bin/hadoop classpath)
[picamera] Solving the problem of video display using Raspberry Pi Camera
When I tried to use Raspberry Pi Camera to display video or image, I encountered a problem that there is no image frame and the GUI showed a black frame on the screen. It took me a while to figure out this issue.
After searching the similar error on the Internet, I found it is related with using picamera library v1.11 and Python 2.7. So I try downgrading to picamera v1.10 and this should resolve the blank/black frame issue:
The linux command is as follows:
$ sudo pip uninstall picamera
$ sudo pip install 'picamera[array]'==1.10
So, it seems there are some issues with the most recent version of picamera that are causing a bunch of problems for Python 2.7 and Python 3 users.
[Kafka] Install and setup Kafka
Kafka is used for building real-time data pipelines and streaming apps. It is horizontally scalable, fault-tolerant, wicked fast, and runs in production in thousands of companies.

Install and setup Kafka
$ sudo useradd kafka -m
$ sudo passwd kafka
$ sudo adduser kafka sudo
$ su - kafka
$ sudo apt-get install zookeeperd
To make sure that it is working, connect to it via Telnet:
$telnet localhost 2181
$ mkdir -p ~/Downloads
$ wget "http://mirror.cc.columbia.edu/pub/software/apache/kafka/0.8.2.1/kafka_2.11-0.8.2.1.tgz" -O ~/Downloads/kafka.tgz
$ mkdir -p ~/kafka && cd ~/kafka
$ tar -xvzf ~/Downloads/kafka.tgz --strip 1
$ vi ~/kafka/config/server.properties
By default, Kafka doesn't allow you to delete topics. To be able to delete topics, add the following line at the end of the file:
⇒ delete.topic.enable = true
Start Kafka
$ nohup ~/kafka/bin/kafka-server-start.sh ~/kafka/config/server.properties > ~/kafka/kafka.log 2>&1 &
Publish the string "Hello, World" to a topic called TutorialTopic by typing in the following:
$ echo "Hello, World" | ~/kafka/bin/kafka-console-producer.sh --broker-list localhost:9092 --topic TutorialTopic
$ ~/kafka/bin/kafka-console-consumer.sh --zookeeper localhost:2181 --topic TutorialTopic --from-beginning
[InfluxDB] Install and setup InfluxDB
Download the source and install
$ wget https://s3.amazonaws.com/influxdb/influxdb_0.12.1-1_amd64.deb$ sudo dpkg -i influxdb_0.12.1-1_amd64.deb
Edit influxdb.conf file
$ vim /etc/influxdb/influxdb.conf
Restart influxDB
$ sudo service influxdb restartinfluxdb process was stopped [ OK ]
Starting the process influxdb [ OK ]
influxdb process was started [ OK ]
$ sudo netstat -naptu | grep LISTEN | grep influxd
tcp6 0 0 :::8083 :::* LISTEN 3558/influxd
tcp6 0 0 :::8086 :::* LISTEN 3558/influxd
tcp6 0 0 :::8088 :::* LISTEN 3558/influxd
Client command tool
$influx> show databases
Tuesday, May 9, 2017
[OpenGL] Draw 3D and Texture with BMP image using OpenGL Part I
It has been more than half of year not posting any article in my blogger and that makes me a little bit embarrassed. Well, for breaking this situation, I just quickly explain a simple concept about OpenGL coordinate.
Before taking an adventure to OpenGL, we have to know the coordinate in OpenGL first. Please check out the following graph. As we can see, the perspective of z position is pointed to us and it's so different from OpenCV.

If we take a look closer, the following OpenGL code can be explained in the picture below:
glBegin(GL_QUADS) # Start Drawing The Cube
# Front Face (note that the texture's corners have to match the quad's corners)
glTexCoord2f(1.0, 0.0); glVertex3f(-1.0, -1.0, 1.0) # Bottom Left Of The Texture and Quad
glTexCoord2f(1.0, 1.0); glVertex3f( 1.0, -1.0, 1.0) # Bottom Right Of The Texture and Quad
glTexCoord2f(0.0, 1.0); glVertex3f( 1.0, 1.0, 1.0) # Top Right Of The Texture and Quad
glTexCoord2f(0.0, 0.0); glVertex3f(-1.0, 1.0, 1.0) # Top Left Of The Texture and Quad
# Back Face
glTexCoord2f(1.0, 0.0); glVertex3f(-1.0, -1.0, -1.0) # Bottom Right Of The Texture and Quad
glTexCoord2f(1.0, 1.0); glVertex3f(-1.0, 1.0, -1.0) # Top Right Of The Texture and Quad
glTexCoord2f(0.0, 1.0); glVertex3f( 1.0, 1.0, -1.0) # Top Left Of The Texture and Quad
glTexCoord2f(0.0, 0.0); glVertex3f( 1.0, -1.0, -1.0) # Bottom Left Of The Texture and Quad
# Top Face
glTexCoord2f(0.0, 1.0); glVertex3f(-1.0, 1.0, -1.0) # Top Left Of The Texture and Quad
glTexCoord2f(0.0, 0.0); glVertex3f(-1.0, 1.0, 1.0) # Bottom Left Of The Texture and Quad
glTexCoord2f(1.0, 0.0); glVertex3f( 1.0, 1.0, 1.0) # Bottom Right Of The Texture and Quad
glTexCoord2f(1.0, 1.0); glVertex3f( 1.0, 1.0, -1.0) # Top Right Of The Texture and Quad
# Bottom Face
glTexCoord2f(1.0, 1.0); glVertex3f(-1.0, -1.0, -1.0) # Top Right Of The Texture and Quad
glTexCoord2f(0.0, 1.0); glVertex3f( 1.0, -1.0, -1.0) # Top Left Of The Texture and Quad
glTexCoord2f(0.0, 0.0); glVertex3f( 1.0, -1.0, 1.0) # Bottom Left Of The Texture and Quad
glTexCoord2f(1.0, 0.0); glVertex3f(-1.0, -1.0, 1.0) # Bottom Right Of The Texture and Quad
# Right face
glTexCoord2f(1.0, 0.0); glVertex3f( 1.0, -1.0, -1.0) # Bottom Right Of The Texture and Quad
glTexCoord2f(1.0, 1.0); glVertex3f( 1.0, 1.0, -1.0) # Top Right Of The Texture and Quad
glTexCoord2f(0.0, 1.0); glVertex3f( 1.0, 1.0, 1.0) # Top Left Of The Texture and Quad
glTexCoord2f(0.0, 0.0); glVertex3f( 1.0, -1.0, 1.0) # Bottom Left Of The Texture and Quad
# Left Face
glTexCoord2f(0.0, 0.0); glVertex3f(-1.0, -1.0, -1.0) # Bottom Left Of The Texture and Quad
glTexCoord2f(1.0, 0.0); glVertex3f(-1.0, -1.0, 1.0) # Bottom Right Of The Texture and Quad
glTexCoord2f(1.0, 1.0); glVertex3f(-1.0, 1.0, 1.0) # Top Right Of The Texture and Quad
glTexCoord2f(0.0, 1.0); glVertex3f(-1.0, 1.0, -1.0) # Top Left Of The Texture and Quad
glEnd(); # Done Drawing The Cube

So, right now, if we just look at the first section of the code as follows, it represents the blue quadrilateral for the front face.

And, the texture coordinate represents the direction of the image.

In sum, we can see the result just like this:


Before taking an adventure to OpenGL, we have to know the coordinate in OpenGL first. Please check out the following graph. As we can see, the perspective of z position is pointed to us and it's so different from OpenCV.

If we take a look closer, the following OpenGL code can be explained in the picture below:
glBegin(GL_QUADS) # Start Drawing The Cube
# Front Face (note that the texture's corners have to match the quad's corners)
glTexCoord2f(1.0, 0.0); glVertex3f(-1.0, -1.0, 1.0) # Bottom Left Of The Texture and Quad
glTexCoord2f(1.0, 1.0); glVertex3f( 1.0, -1.0, 1.0) # Bottom Right Of The Texture and Quad
glTexCoord2f(0.0, 1.0); glVertex3f( 1.0, 1.0, 1.0) # Top Right Of The Texture and Quad
glTexCoord2f(0.0, 0.0); glVertex3f(-1.0, 1.0, 1.0) # Top Left Of The Texture and Quad
# Back Face
glTexCoord2f(1.0, 0.0); glVertex3f(-1.0, -1.0, -1.0) # Bottom Right Of The Texture and Quad
glTexCoord2f(1.0, 1.0); glVertex3f(-1.0, 1.0, -1.0) # Top Right Of The Texture and Quad
glTexCoord2f(0.0, 1.0); glVertex3f( 1.0, 1.0, -1.0) # Top Left Of The Texture and Quad
glTexCoord2f(0.0, 0.0); glVertex3f( 1.0, -1.0, -1.0) # Bottom Left Of The Texture and Quad
# Top Face
glTexCoord2f(0.0, 1.0); glVertex3f(-1.0, 1.0, -1.0) # Top Left Of The Texture and Quad
glTexCoord2f(0.0, 0.0); glVertex3f(-1.0, 1.0, 1.0) # Bottom Left Of The Texture and Quad
glTexCoord2f(1.0, 0.0); glVertex3f( 1.0, 1.0, 1.0) # Bottom Right Of The Texture and Quad
glTexCoord2f(1.0, 1.0); glVertex3f( 1.0, 1.0, -1.0) # Top Right Of The Texture and Quad
# Bottom Face
glTexCoord2f(1.0, 1.0); glVertex3f(-1.0, -1.0, -1.0) # Top Right Of The Texture and Quad
glTexCoord2f(0.0, 1.0); glVertex3f( 1.0, -1.0, -1.0) # Top Left Of The Texture and Quad
glTexCoord2f(0.0, 0.0); glVertex3f( 1.0, -1.0, 1.0) # Bottom Left Of The Texture and Quad
glTexCoord2f(1.0, 0.0); glVertex3f(-1.0, -1.0, 1.0) # Bottom Right Of The Texture and Quad
# Right face
glTexCoord2f(1.0, 0.0); glVertex3f( 1.0, -1.0, -1.0) # Bottom Right Of The Texture and Quad
glTexCoord2f(1.0, 1.0); glVertex3f( 1.0, 1.0, -1.0) # Top Right Of The Texture and Quad
glTexCoord2f(0.0, 1.0); glVertex3f( 1.0, 1.0, 1.0) # Top Left Of The Texture and Quad
glTexCoord2f(0.0, 0.0); glVertex3f( 1.0, -1.0, 1.0) # Bottom Left Of The Texture and Quad
# Left Face
glTexCoord2f(0.0, 0.0); glVertex3f(-1.0, -1.0, -1.0) # Bottom Left Of The Texture and Quad
glTexCoord2f(1.0, 0.0); glVertex3f(-1.0, -1.0, 1.0) # Bottom Right Of The Texture and Quad
glTexCoord2f(1.0, 1.0); glVertex3f(-1.0, 1.0, 1.0) # Top Right Of The Texture and Quad
glTexCoord2f(0.0, 1.0); glVertex3f(-1.0, 1.0, -1.0) # Top Left Of The Texture and Quad
glEnd(); # Done Drawing The Cube
So, right now, if we just look at the first section of the code as follows, it represents the blue quadrilateral for the front face.

And, the texture coordinate represents the direction of the image.

In sum, we can see the result just like this:
Subscribe to:
Posts (Atom)